This guide explains how to install an SSL (TLS) certificate on your domain name with Loopia. You can either buy an SSL certificate directly from your Loopia customer zone or upload an existing certificate from another supplier so that your website runs over HTTPS (secure HTTP) and shows the padlock (lock icon) in the browser.
Note that we currently only offer SSL support for domains on our UNIX platform or autobahn. SSL certificates are not available for domain names placed on a Windows server, Tictail or our Sitebuilder.
Buy and install a certificate through Loopia
We currently offer two types of certificate at Loopia. A Wildcard certificate protects your domain name including all of your sub-domains (for example, shop.yourdomain.com, blog.yourdomain.com, etc.).
The other certificate is a simple certificate that protects your domain together with www, meaning yourdomain.com and www.yourdomain.com.
If you have already installed a WordPress website on Loopia through our One Click installer, you can move your media files to a sub-domain such as media.yourdomain.com using our separate guide. That way you can later protect your website with the simpler (and cheaper) SSL certificate.
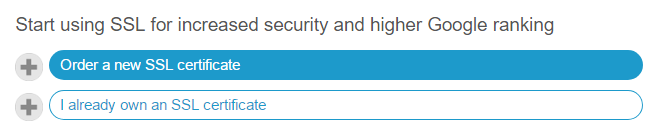
Log in to your customer zone. At the top of the page you will find our quick guide to ordering SSL for your domain name.

Choose to buy a certificate.
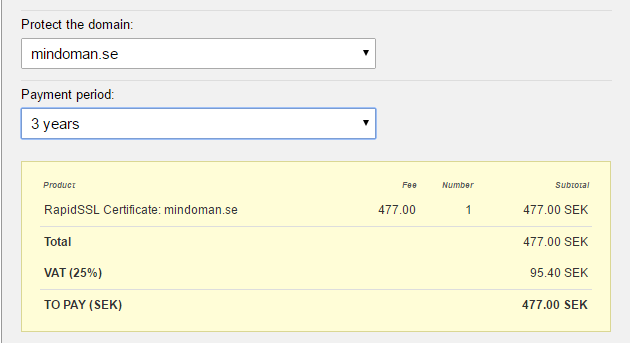
Now choose the type of certificate you want to buy, the domain you want to protect and the billing period. We recommend a 3-year period.
Read through the agreement and tick the box to confirm that you accept it in order to complete the purchase. Note that the certificate issuer will send a confirmation email to the address admin@yourdomain.com as part of the purchase.
If the domain name has email handled through Loopia, this email address is created automatically as a forwarder that delivers to the technical contact on the account (the same person who also receives user information). If your email is handled through another registrar, you must create this email address before you can complete the purchase.
You can then pay for the purchase directly with credit card or wait for the invoice, which usually arrives within a few minutes. The purchase is processed as soon as the payment has been registered.
Within a couple of hours you will receive a confirmation email from GeoTrust, our SSL certificate partner, with the subject “RapidSSL order received for Domain xxx.xx“. This email is for information only and requires no action. Shortly afterwards you will receive another email from the same sender with the subject “RapidSSL Certificate Request Confirmation” containing a confirmation link that you need to click.
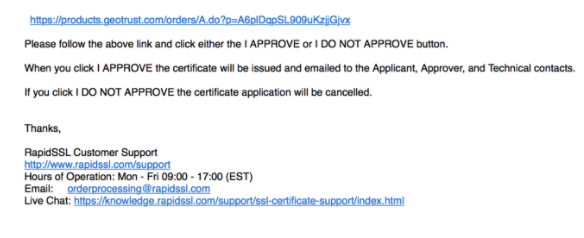
You will then arrive at our partner’s portal, where you choose whether or not to accept your SSL purchase.

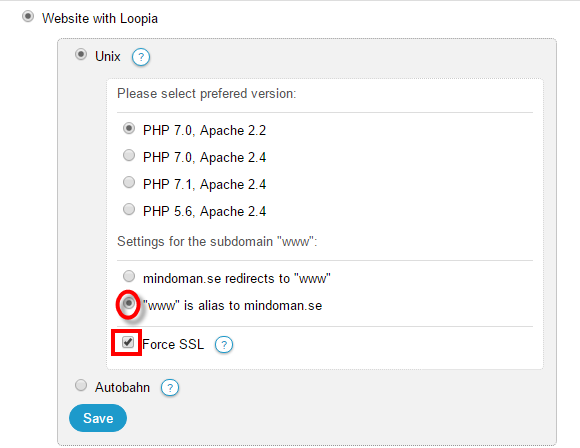
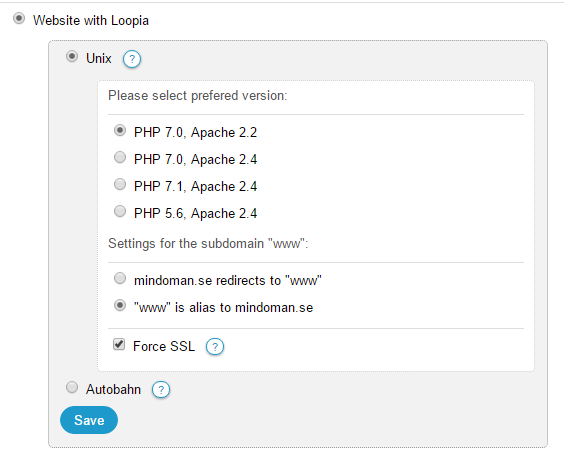
Once you have accepted, it will only take a few minutes before you receive a message confirming that the certificate is ready. The message also tells you how to install the certificate on the server. You do not need to do this yourself — we work directly with the certificate provider, so the certificate is installed automatically on your web server with us. If the domain has already been moved to our platform with SSL support, you can update all internal links on the website to use HTTPS and then activate the option in the customer zone that forces all traffic over HTTPS to your website.
Choose to save, and you are done. You can check that everything is working by visiting your website and confirming that the address bar shows HTTPS and that the browser indicates a secure connection with a padlock (lock icon) on the left.
![]()
Install a certificate from another provider
If you already have a certificate from, for example, Let’s Encrypt, you can simply upload it for your domain through your customer zone instead of buying a new one.

Choose the option that says you already own an SSL certificate, and paste the certificate into the next window.
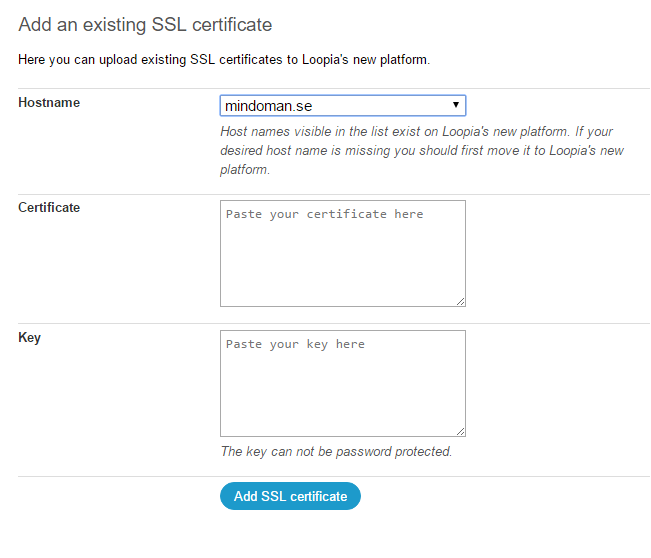
Click “Add” and you are done. You can now update any internal links on your website to use HTTPS, and then in your control panel choose to force all traffic to HTTPS.
Click save, and your website will now be secured with SSL.
You can check that everything is working by visiting your website and confirming that the address bar shows HTTPS together with the secure-site indicator in the top-left corner of your browser.
![]()
More information about SSL
SSL stands for Secure Sockets Layer (today succeeded by TLS, Transport Layer Security) and is used to encrypt information between a server and a client (the visitor). This makes it impossible for third parties to intercept traffic between your SSL-secured website and your visitors.
The SSL certificate is also signed, which makes it possible to identify the website. You can inspect the signing details of a certificate by clicking the small padlock icon shown in your browser when you visit an SSL-secured website.
We use 256-bit SSL encryption. For more information about SSL, we recommend the following resource: