This guide allows you to move a WordPress page between two domain names in a Loopia account. For example, it may be about moving from blog.mydomain.com to mydomain.com.
1. Configure the domain name
The domain name you want to move the WordPress page to must have the UNIX configuration for WordPress to work. This you do by doing following:
- Log in to your Loopia Customer zone.
- Click on the domain name you want to move the site to.
- Choose the configuration “homepage at Loopia” -> “UNIX” and click on “save“.
Configure a media-sub domain
If your current page is installed with our One Click Installer, it most likely has a separate sub domain for media files (Images, videos, etc.), such as media.yourdomain.com. If you move a WordPess between two different domain names (such as yourgames.com to yournewdomain.com), you must also configure a new media sub domain (for example, media.yournewdomain.com). If WordPress has moved from a sub domain to a main domain or vice versa, skip this step.
- At the right side of the customer zone, click “Add/Create…” -> “Sub domains“.
- Select your new domain name in the list and enter “media” in the “New Sub domains” field.
- Click “add“.
- Click on the domain name and change the configuration to “Autobahn” and click “Save“.
2. Move the files
- Log in to your FTP account.
- Rename the folder where the page is currently located with folders where you want the page to be located (change to example yourgames.com to yournewdomain.com and vice versa).
- If you have configured a new sub domain (see above), you also switch the name of these folders (such as media.yourolddomain.com and media.yournewdomain.com).
If you have files on a domain name that is not included in WordPress and that you do not want to move, then the method to only rename the folders not so good to do. Instead, manually copy the WordPress content between the folders.
3. Configure WP Super Cache
If you installed WordPress via our One Click Installer, you may need to edit another file for the WP Super Cache extension to work properly after moving/copying your WordPress page.
Open the wp-content/wp-cache-config.php file and find the $cache_path line. If you can not find the file, you do not need to proceed with the step below:

This search path must be updated with your absolute cache search path. If you do not know what your account’s absolute cache search path is, you can always contact us at support@loopia.se to get this.
In some cases, you must also update the wp-content/advanced-cache.php file if an absolute search path is specified there:

Note that this absolute search path should be different from the cache search path above. If you do not know what your account’s absolute search path is, contact us at support@loopia.se to get it.
4. Change in the database
What’s left now is to update the old domain name with the new one in the database. Do this with the searchreplacedb2.php file. It can be downloaded here.
- Log in to your FTP account and add the file to yourdomain.com/public_html folder.
- Now you will visit the script itself, in this example, it will be http://mindoman.se/searchreplacedb2.php.
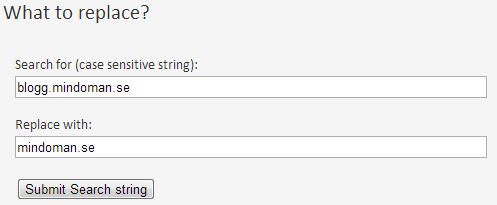
- Click through the guide until you get to the step “What to replace?“.
- Enter your old domain under “Search for” and your new one under “Replace with“.

5. The changes in the database
What’s missing now is to update the old domain name with the new one in the database. Whether it should be the same domain name for the page (for example, if you move the page from another provider), skip this step.
This change can be done with the help of a script that you can download here. You are downloading locally a .ZIP file that you extract with optional compressor program that supports ZIP files or right-click the file and select “Extend All” and follow the instructions. The folder (Search-Replace-DB master) that you get when the process is complete will load it after uploading it to your FTP.
- Log in to your FTP account and place the folder under mydomain.com/public_html. Now you will visit the script itself. In this example, this URL will be http://mindoman.se/Search-Replace-DB-master.
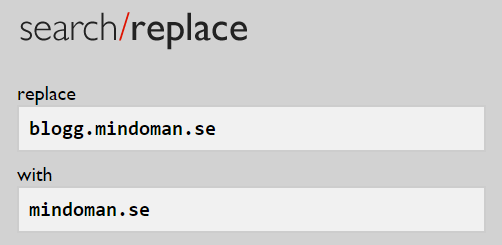
- Enter your old domain under “replace” and your new one under “with“.

3. Then click on “live run” to make the changes.

4. At the end, click “delete me” to remove the script from your material now as there is a security risk to keep it on your server.
