A child theme in WordPress lets you customise the look or behaviour of an existing theme (template) – for example removing the “Powered by WordPress” footer or restyling a heading – without editing the theme’s own files. This matters because when the parent theme is updated, any changes you made directly to its files would be overwritten. A child theme keeps your modifications in a separate folder, so updates to the parent theme can be installed safely. This guide walks you through creating one step by step.
Why use a child theme?
Themes need regular updates to patch security holes and stay compatible with new WordPress versions – we strongly recommend installing those updates as they appear. Without a child theme, an update will replace the theme files and erase your changes. With a child theme, your customisations live in their own folder and survive every update.
In short: you create a small folder with two files – a stylesheet that tells WordPress which parent theme it extends, and (optionally) a screenshot – then activate it from the dashboard.
Get started
First, connect to your hosting with an FTP client. See how to add and connect to an FTP account if you need a refresher.
Navigate to your WordPress installation at example.com/public_html/wp-content/themes. Make a note of the exact folder name of the parent theme you want to base your child theme on – you will need it in a moment. This guide uses the twentysixteen theme as an example, but any theme works.
Create a new folder alongside the existing themes, for example twentysixteen-child.
Create the child theme stylesheet
Inside the new folder, create a file called style.css. You can create it locally and upload it, or create it directly through your FTP client. Open it in a plain text editor and add the following header at the very top:
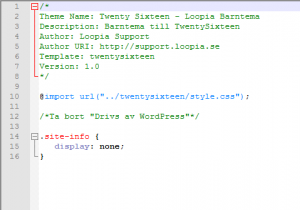
/*
Theme Name: My Child Theme
Description: Child theme for TwentySixteen [optional]
Author: Your name [optional]
Author URI: Your website [optional]
Template: twentysixteen
Version: 1.0 [optional]
*/
The fields:
- Theme Name – the name of your child theme as it will appear in the dashboard.
- Theme URI – if you plan to share the theme, the address where it can be downloaded.
- Description – a short description shown in the WordPress admin interface.
- Author – your name or your organisation’s name.
- Author URI – your website.
- Template – the folder name of the parent theme. This must match the folder under wp-content/themes exactly, including capitalisation.
- Version – useful if you plan to release updates of your own child theme.
Only Theme Name and Template are strictly required – the rest are optional but recommended.
Tell the child theme to load the parent stylesheet
Below the header comment, add the following line so that your child theme inherits the parent theme’s styles:
@import url("../twentysixteen/style.css");
This tells WordPress to look one folder up (..), then into the twentysixteen folder, and load its style.css. (Note: modern best practice is to enqueue the parent stylesheet from a functions.php file instead, but the @import approach still works and is the simplest place to start.)
Save the file. Your child theme now exists.
Add your customisations
Any CSS rules you add to style.css below the @import line will override the parent theme. In the example below, three rules have been added to hide the “Powered by WordPress” line in the footer.
Add a screenshot for the child theme
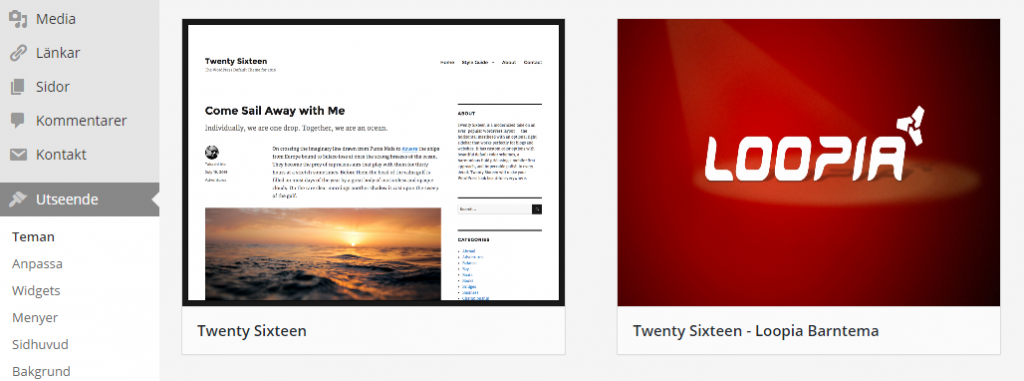
If you go to Appearance > Themes in the dashboard, you’ll see your child theme listed but without a preview image like the other installed themes. To add one:
- Create an image at 1200 × 900 pixels (the recommended size).
- Save it as screenshot.png.
- Upload it to the same child theme folder where your style.css lives.
Reload the Themes page – your screenshot should now appear.
 Activate the child theme
Finally, go to Appearance > Themes, hover over your new child theme and click Activate. From now on, your site uses the child theme – you can update the parent theme as often as needed without losing your changes.